Bob's Bloggers
A community of bloggers who live and die to DIY
bathroom, flooring, diy
Laying Down Basket-Weave Tile
By Picardy Project on Jan 08, 2013
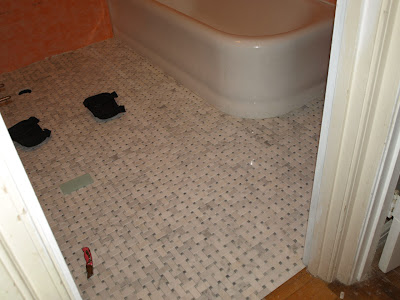
You may remember that we have basketweave in our main bathroom.
And you may remember that we hated every second of laying it and swore that we wouldn't do it again. I was especially violent and angry while I was cutting each individual tile around the curve in the tub
But of course we're ridiculous and decided that, despite all the anger, cussing, and throwing of objects that occurred while laying the basket-weave in the main bathroom, we would still install basket-weave in the back bathroom.
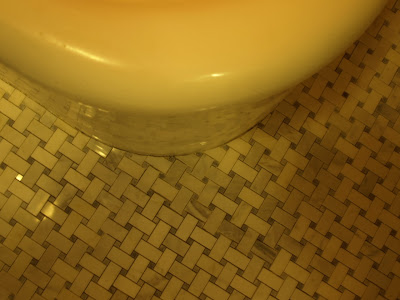
What made this project even more fun was that the tile was a disaster to work with. Mosaic is already more difficult to work with than field tiles, because they need to be set down very carefully with a lot of attention paid to proper spacing of each piece (they're all attached on a mesh sheet, but there is wiggle room for individual tiles getting all wonky). But this tile was the biggest fucking headache. NORMALLY mosaic sheets come interlocking, meaning that not all four sides are the same, so they slide into each other easily. But no, not these sheets. Every side was the same

Two sides shouldn't have had those tiny little green pieces to make the sheets join together. But to make things fun, they didn't. So I spent hours on my hands and knees cutting the stupid green pieces off of two of the sides of every tile sheet

That sucked. But you know what was even more fun? Sometimes they still didn't interlock properly! I just decided two sides next to each other would have their green squares cut off, and then I'd cut them off. Then Chris would take the sheet and try to lay it down with a sheet that was already down, and it didn't weave together properly. Damnit!
So I would only have to cut one or two sheets ahead of him so that I could look at how the tiles were laying out, grab a sheet that hadn't been cut, hold it against the tiles already down and figure out what sides I needed to cut from. It made the process go really, annoyingly slow.
We thought we'd be able to knock out the floor in a day. But no. Those stupid cuts just made it more fun. And if the cuts weren't annoying enough, the glue they used to fix the tile to the mesh sheet was like fucking gorilla glue, and if I hit a big glob of it (which happened frequently), it required me to spend about three times as long to saw through. Grrrrr.
Oh, and half the boxes had paper between the sheets

And half had nothing

Which resulted in chipped tiles (there was nothing protecting them). It was fine when the green dots got chipped, because god knows we had plenty of leftover pieces that I'd been cutting off. But when we had to replace a white piece, it was pretty annoying. Grrrr again.
Good thing the tile looked so gorgeous as it was going down. The headache only resulted in me chucking a sheet of tiles and the utility knife once


That was where we got after day 1. It's preferable to get it all done in one day, because then all the little tiny chunks of thinset you didn't clean up have to be cut out with a utility knife after they're hard and dry so that they don't disturb the tile laying flat

Yep, more fun.
Day 2 was more of the same: Meryl cutting off the green pieces, trying to figure out how the sheets locked together with Chris prepping, laying out the thinset, and putting the sheets down

When we got around the shower, the cuts weren't too difficult. Chris just marked the sheets with a tile pencil, and I took them outside to cut them down)

Day 2 went much quicker (we were well versed in the annoyances of the tile) and within a couple hours we were reaching the end of the room


Ahhhh, beyootiful

But you know what's not?

The wasteful pile of individual tiles I cut piece by piece from each sheet. Grrrr a third time. The tile may look amazingly wonderful, but I would NOT use this tile. The picture on the site now has one side that's interlocking, so maybe they modified from when we bought it two years ago.
Either way, with only one side made to be interlocking that still leaves another side that you get to painstakingly cut each individual green square off of.
Let me just look at the floor again to calm myself
Ahhh, much better.