Bob's Bloggers
A community of bloggers who live and die to DIY
diy, electrical
DIY Tales: Rewiring a Lamp
By AZ DIY Guy's Projects on Dec 19, 2013
The switch on our living room lamp broke, leaving my favorite quiet spot too dark. Being the handy guy about town that I am, I thought I'd take a stab at repairing it rather than search for a new lamp. How hard could it be? As it turns out, it was technically very easy, but physically, this particular lamp was a bit tricky.
Lamps are simple creatures. Generally, they're a series of raceways that the electrical cord goes through to reach the socket for the light bulb. There's hollow tubes, threaded nipples, nuts, washers, lock washers, and screws, but that socket is where all the real action is. The rest is just decoration and structure.
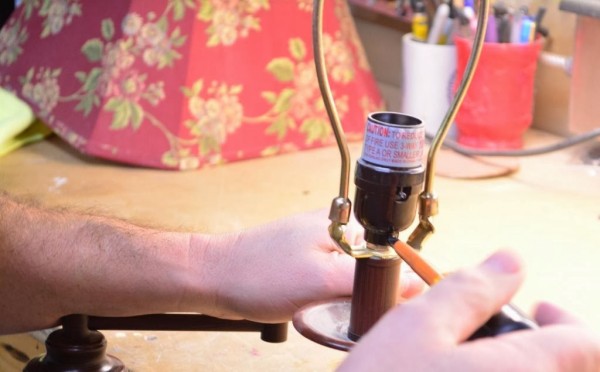
To start, it's an easy operation to unscrew the finial that holds the shade in place.

|
| This floral shade is way to pretty for my workshop. |

See: AZ DIY Guy's Scary Warning - Electrical Edition
Our switch knob was mysteriously broken off. Those of you with children have undoubtedly heard many times before, "I don't know..." (what happened to it).

The next series of events was simply a dis-assembly process. First, I took out the little set screw that keeps the socket from unscrewing from the nipple. I use an insulated screwdriver, which not necessary here, but it's my favorite one, a nice comfortable Klein. Unlike the beautiful new one Jeff at Home Repair Tutor used on his florescent light repair last week, mine looks like it's served in front-line combat. I'm jealous.
|
| Removing the set screw. |
This socket unscrewed in the middle. Some versions simply need to be popped open to expose the electrical connections.

There was no slack in the wire. I couldn't pull the socket from its housing to get at the screws, so I chucked the whole lamp up on the workbench and fed the cord up from the base, into the vertical, hollow pole.

Many floor lamps are simple, stick-straight units, but this one has an articulated arm. The power cord is fed through very narrow tubes with tight bends. I had to unscrew each section to get as close to the joint as possible, to feed the cord. Channel Lock pliers did the trick nicely.

Once the retaining nut is off, whole sections come apart easily. Little caps pop off to allow access to the joints. I took the liberty of promptly dropping this one and crushing it under my boot, like an oaf.

Once the joints were open, it was a "simple" matter of man-handling the cord up towards the socket, feeding it and pulling slowly, taking care not to damage the cord. Damaging the insulation is referred to, in technical, electrical terms as, "BAD". A bare copper conductor, without the protection of the rubbery cord coating, touching the metal parts of the lamp would cause a direct short, hopefully tripping a breaker, instead of much worse.

|
| A little of the old push 'n pull technique |
With enough slack to pull the socket itself out, you can see there is a silver screw and a brass one, just like a a wall outlet. The important thing to watch here is identifying which wire goes where. You can't tell what color the they are. You can mark one with tape as you pull it off or, even better, look very closely at the two wires that make up the cable. In this case, the neutral (grounded conductor - normally a white wire) has ridges on the outer jacket, while the hot (ungrounded conductor - normally a black wire) is smooth. Remember this for later.

|
| Like Ruffles, it has ridges. |
I still needed more slack to install a new socket. It wasn't easy at all. There was no space in those transitions and I had trouble getting the cord to budge. So, I used a trick a salty old electrician shared with me years ago. Normally, electricians use a special lubricant when pulling wire through conduit. In a pinch, he showed me they can use dish soap. I was in a pinch, so...

|
| Yes, it's "green apple" scent. |
I fought the cord, bit by bit through the fixture, leaving slack at each elbow. The slippery soap helped, and kept me from damaging the wire.

With enough slack pulled and more than enough parts strewn haphazardly across my workbench, it was time to quest out into the open world for the replacement parts. I headed out to my friendly neighborhood hardware store with the old socket in my pocket and dreams that their popcorn machine would be in action. Surely they'd have something in stock I could use (besides a bag of free popcorn).
I faced the electrical lighting section at the hardware store. They had EVERYTHING! There's parts for all kinds of stuff that I never paid attention to. Heck, you can build your own lamp with the stuff they have here.
Note to self: future project - find a shapely, plastic woman's leg and make my own, fragile Christmas Story lamp to display in our front window. The wife will love it!

Of the various sockets, I chose a replacement 3-way rather than a standard on/off only switch. This allows the use of a bulb with three filaments for different lighting levels. This works nicely with a 30/70/100 watt light bulb. It's something you can retrofit onto an existing on/off fixture for a nice upgrade. They were actually the same price.

Returning home, sadly without any popcorn, I cracked the new socket open like an egg. It was a snap-together unit, rather than threaded like the old one.

The base then screws onto the nipple from the lamp and gets held in place again by the set screw. Its easy to peel the two wires apart by hand, since I finally had plenty of slack to work with.

Here's a close up of those ridges on the neutral wire. Take a look at a lamp cords in your house. They'll probably have these and you've never noticed it. I think it's a secret communication method left to us by Ben Franklin. The string hanging down from his kite with a key probably had ridges just like this. That dude was smart.

|
| Believe it or not, I've never had a manicure my whole life. Honest! |
Remember to use the correct wire on the its corresponding termination screw - with the neutral landing on the silver screw. This is important. If you reverse the wires, the lamp will work just fine, but there's a safety hazard. The threaded shell for the lamp becomes the hot, electrified portion and the contact tab deep in the socket becomes the grounded neutral. This places the dangerous, "hot" way too close to accidental contact should anyone ever change a lamp with the switch on (and who hasn't done that?). Considering the lamp itself is metal, that's a recipe for pain, or worse.

I stripped the insulation back a half inch using wire strippers, twisted the strands together, and wrapped it around the screw clockwise. As the screw is tightened, it pulls the strands tighter rather than pushing back a rat's nest of frizzy copper. I wanted a good connection with no loose copper strands to sticking their electrified noses where they didn't belong.

After that, it was just a matter of reassembling everything I had taken apart, in reverse order. It's probably best to lay the pieces in order on your workbench rather than fling them randomly about like I did, resulting in a pissed-off Easter egg hunt. I fed the cable backwards through all the elbows until there was just enough to fit into the socket enclosure. All the various nipples threaded back in with their retaining nuts tightened.

I gently threaded the lamp in. Finally, the moment of truth, my friends.. (click) ...

|
|
Blinded by the light, revved up like a deuce, another runner in the night!! - Manfred Mann's Earth Band |
Now comes the victory parade. An adoring family gets to see witness this monumental feat of home repair triumph as it is transported, first to downtown New York for a ticker-tape parade, then to its home, by a comfy chair. Full disclosure: It's cold in New York and surprisingly inconvenient from Phoenix. I skipped that step.
There's nothing better than a nice book under the warm glow of a reading lamp...

zzzz....