Bob's Bloggers
A community of bloggers who live and die to DIY
diy, how to
How To: Install Trim Like a Pro
By The Craftsman on Feb 25, 2013

Installing trim properly requires an eye for detail and a few specific tools and techniques. The best historic trim and moldings were installed in a seamless way called “coping” that hides joints while still allowing for the house to move and settle with the decades. A coped joint is a big part of the installation, and I’ll show you how to achieve this joint and give you a few other tips to help your trim installation go perfectly.
The Right Stuff
If you don’t have the right materials, then you’re defeated from the start, so get the best materials you can afford. I recommend real wood trim for its strength and workability. It is also much more resistant to water and moisture issues than MDF (medium density fiberboard). You can find pre-primed trim and moldings at your local big box store or lumber yard, or if you just need basic 1x lumber, that is available too.
For most carpenters, poplar is the go-to choice for wood trim that will be painted, because it holds paint so well and is relatively inexpensive. Select Pine is another good choice that I use, because it is often less expensive than poplar. Whichever you choose, just make sure it is a relatively clear-grained wood (no knots or flaws).


Stanley Coping Saw
You’ll also need a coping saw. This inexpensive little saw is extremely flexible, so it can make the tight little turns necessary for coping. It also has a unique D-shape that allows it to fit around the piece of trim you are working on. You’ll need to have one of these before you start.
Coping Trim
When you have an outside corner on trim, you break out your mitre saw and cut the two pieces at a 45°. If your walls are square and your floors are level, you put the two pieces up and nail them in place. So you would think that doing the same thing, only in reverse, would work for an inside corner. Nay, nay!
Inside corners are notoriously difficult to get a clean joint without using a coped joint. And once you learn to do this it will make your trim work faster and the joints will be much less noticeable.
* For visual learners, there are photos at the bottom of the post of the important steps.
1. Lay Out the Room. You want a coped joint to hide as best as possible. In order to do this, you should set your layout from the perspective of how occupants will view the room. In each coped joint there are two sides—one side is cut flush and the other is coped to fit over the un-coped piece. You want the un-coped piece to be on the walls that are viewed straight-on. The coped sides belong on the side walls. This isn’t a make-or-break step, but this is what the pros do, and it doesn’t take that much more work to figure this out first.
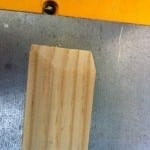
2. Install the Un-Coped Side First. Cut this piece straight and install it flat on the wall. No mitres necessary. Just straight cuts on both ends with the ends butting up against the opposing walls.
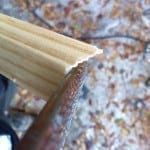
3. Cut the Cope Reveal. Take the piece of trim that is going to be coped to the piece that you just installed and cut a 45° mitre on the face of the trim (like the picture shown below). This will reveal the profile that you need to cope.
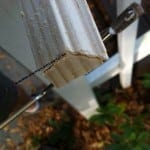
4. Cut the Cope. Take your coping saw and trim along the profile you just revealed. You’ll want to back-cut the cope about 45° as well. This allows the piece of trim to fit snugly on top of its mate. Depending on how complex the profile is on your trim, this may be easy or difficult. It may require several different cuts from different angles to get everything trimmed off. In this example, I made one cut for the top of this window stop and then came around to finish the cope from the bottom.
5. Clean the Cope You may or may not have trimmed it perfectly. In fact it’s usually better to leave a little more material than you need. That way you can come back and clean up the remaining material with a file or rasp.
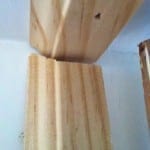
6. Fit the Cope. Once you’ve got your cope cut and cleaned, it’s time to see how you did. Fit it onto the un-coped piece and check what areas may need to be trimmed down a little bit more to get a clean fit. Remember, it’s always easier to remove less material than to remove too much. You can’t really put the wood back, can you?
7. Nail It Up. Once you’ve got it cleaned up, you can cut the other side of the piece to length and nail it in place. Depending on how you have chosen to lay out your room, the other side may need to be cut straight to be the un-coped portion of the next joint, or it may need to be coped as well. Just pay attention to which one it is so you cut it the right length.
Finishing the Right Way
Once the trim is up, the hard part is over! There are just a few more things you need to do before it’s ready to show off.
- Countersink any nail heads that aren’t buried below the surface.
- Fill joints and nail holes with painter's putty.
- Prime any bare wood with an oil-based primer. Learn how to paint with oil-based paints
- After the primer has dried, sand it smooth.
- Paint with two coats of quality enamel paint (My preferred trim paint is Sherwin Williams ProClassic Acrylic Alkyd (and they don’t pay me to say that!).
There you have it: perfectly coped joints that will stay hidden for decades! A coped joint is a telltale sign of a professional job and a feature you definitely want on your trim.
blog comments powered by Disqus